Project 2
Overview
Project 2 provides you the opportunity to build a single page application. You will design the interface and screen states for a simple task management application. Then you'll use provided flowchart and data services to code the interactions. The application will include the following features:
- Account setup for new users
- Login form
- View all existing tasks and filter by category
- Add/edit/delete categories modal panel
- Add/edit/delete tasks modal panel
User Stories
Consider these user stories to understand how the application should function ([app] is a placeholder for the app you're creating and will name as you see fit):
- SETUP: Sarah wants a digital tool to help her keep track of her tasks from day to day. She finds [app] online and decides to create an account. She enters an email address and password to create her account. She sees a confirmation that her account has been created and proceeds to log in.
- ADDING TASKS: Sarah now sees an interface she quickly understands as the space that can hold any tasks she creates. She sees the option to create a task and clicks it. A dialogue appears that prompts her to enter the details for the task including its description, due date, category, and "task type." She's not sure what "category" and "task type" mean so she leaves them as-is. There is also a prominent box that she can tell allows her to mark the task as complete but that is not activated yet (logically since she's just now creating the task... she looks forward to changing that later). She saves the task and it appears on her overall task list in the application. She adds a few more tasks and begins to feel like she's getting the hang of it---and feels great that her mental task list is now feeling manageable.
- UPDATING A TASK: Sarah realizes she made a typo on one task, but finds that simply by clicking in the task area, the same dialogue appears that she used to add a task, but this time it shows the tasks she had clicked so she can make any changes she'd like. She fixes the typo and saves the task. The dialogue disappears and she sees her task is updated in the main task view.
- COMPLETING TASKS: Sarah has completed one of her tasks and returns to the application, excited to check it off her list. She finds the task in her main task view, sees a prominent option to mark it as complete. She clicks that area, sees a satisfying checkmark appear!
- CHANGING TASK TYPE: After completing a few more tasks Sarah is curious about the "task type" option. She clicks on a task to edit it and experiments with changing the "task type" setting from "normal" to "backburner". She sees no other change besides the overall task changing colors to appear "cooler" or "less prominent". She saves the change and sees the same thing in the main task view; where her tasks had all been a moderately normal color, now the "backburner" one appears less obvious than the others, conveying that it is not as "pressing" as the others. Curious about the other setting, she opens another task to change and sets it to "urgent". The opposite effect happens: now this task looks visually more dominant with a warmer, more eye-catching color. She starts making use of these settings to help draw more attention to some tasks than to others.
- ADDING CATEGORIES: Now Sarah has a growing task list that is getting hard to manage. She remembers that she had the option of creating categories for her tasks so she pulls up the system again to take a look. She thinks she has work generally related to "home", "school", and "work", so those would be categories she'd like to add if she can figure out how. She clicks on a task she wants to organize as a "home" task. For the category option she sees "no category" is listed beside it but with an option to add a new category. She clicks this, and a box appears prompting her to name the category. She enters, "Home" and saves it. She is returned to her task where she can now see this new category is an option she can select. She selects it and saves the task. That was pretty easy. But now she also realizes that a portion of the main screen she had overlooked earlier shows her new "Home" category listed after "All tasks" (which appears "selected at this time") and also has an option to add a new category. She clicks this and sees the same box appear. She enters, "Work" and saves it. She repeats and creates the "School" category. Now all three appear in a list in a panel beside her main task list along with "All tasks". When she clicks on "Home" she sees just the one task she had assigned to that category earlier. She has many others she wants to add. She clicks on the "All tasks" option and edits another task to be part of the "Home" category. She repeats this a few more times until all the tasks she wants in "Home" are moved accordingly. She repeats the same thing for each of the other categories. This was a lot of work... from now on she'll put them in the right categories from the start!
- MARKING OVERDUE TASKS: Sarah notices something alarming... one of her tasks is past due! It is pretty obvious in her task list because the deadline is very eye-catching and also says, "overdue". She gets to work and quickly finishes the task, then returns to mark it complete.
Data Structures
Users will include the follow data structure:
| Field Name | Data type | Notes |
|---|---|---|
| id | Integer | Unique to each user across the system |
| name | String | User's name (as they desire to enter it) |
| Integer | User's email address | |
| password | String | Encrypted version of the password the user provides at signup |
Tasks will include the following data structure:
| Field Name | Data type | Notes |
|---|---|---|
| id | Integer | Unique to each task across the system |
| owner | String | id the user who owns the task |
| description | Integer | |
| dueDate | Date | Database dates are typically stored as YYYY-MM-DD |
| category | Integer | id for the category to which this task belongs |
| taskType | Integer | id for the task type assigned to this task |
| status | 0 or 1 | 0 when not complete and 1 when complete |
Categories will have the following data structure:
| Field Name | Data type | Notes |
|---|---|---|
| id | Integer | Unique to each category across the system |
| name | String | |
| owner | Integer | id for the User who created/owns the category |
Task types will include a user-friendly name and a backend alias you can use for classes in HTML and CSS. Rather than just spell out the data structure, here is the actual table of task types:
| id | name | alias | order |
|---|---|---|---|
| 1 | Normal | type--norm | 1 |
| 2 | Backburner | type--back | 2 |
| 3 | Urgent | type--urgent | 3 |
Deliverable A: Design Drafts
Use what you've imagined about this application based on the details above to create mockups of each of the screens and states that will be included.
Here is a very rough main interface wireframe as a simple reference:
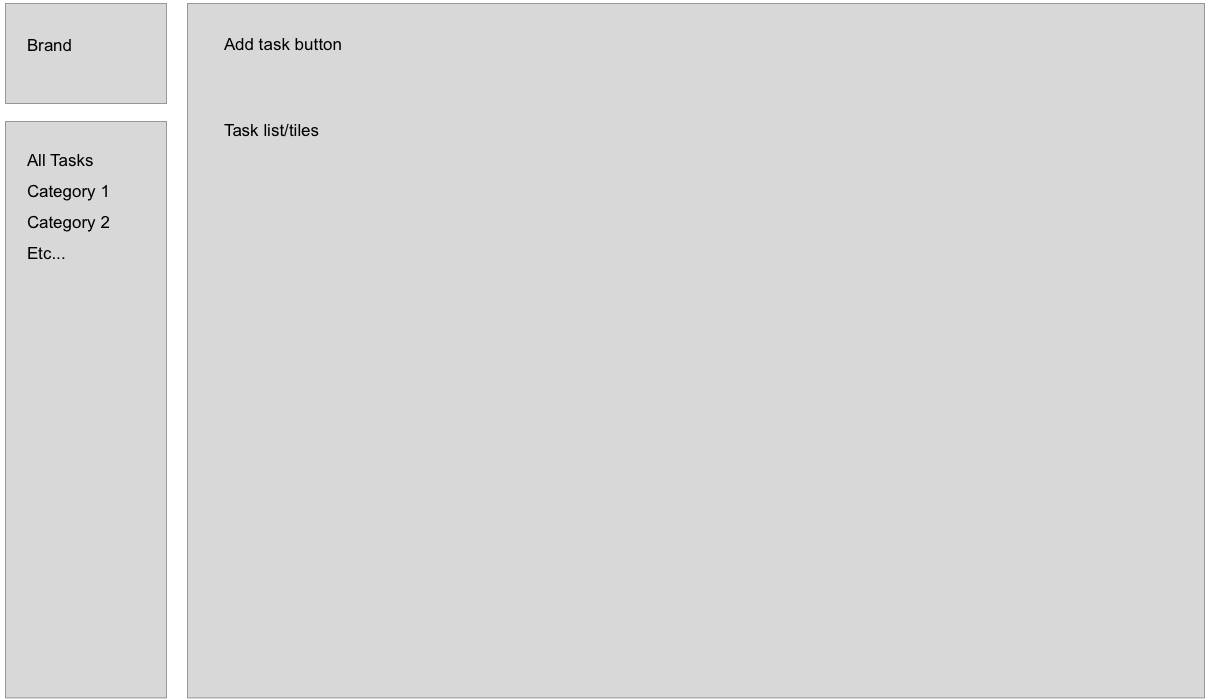
Your mockup should include your full intended style for the application: colors, type, icons, etc.
Be sure to include the following screens and states in your submission:
- Login screen.
- Account setup form include inputs for a name, email address, password, password confirmation.
- Main task screen including tasks of different types as described above. Also consider how to flag overdue tasks (but don't confuse this with the task type).
- Modal panel for adding/editing tasks.
- Modal panel for adding/editing categories.
Also consider styles for buttons including states for normal and hover.
Create a project in InVision and sync your artboards from Sketch to this project. Link screens and states together as you're able. Then add your professor as a collaborator on your InVision project. Include the shareable URL for your project in your submission.
Deliverable B: Design Finals and Static Build
Update your comps based on feedback from your professor.
Next we'll begin to do our coding work in the project space provided in Codio. Note that there is an api folder that contains the PHP backend code that will handle the REST API for this application. You can disregard this folder.
Next create markup and initial styles to start a static build out of the application. For now you can use separate HTML pages for the different screens of the application just as you have for most of your projects in the past. The styles you set up will remain intact but the pages you set up will be broken down into separate templates in the next deliverable. No JavaScript is needed at this point.
Deliverable C: Static Build and Templates
Finish your static build out of your interface pages.
Then convert to templates and core files as follows:
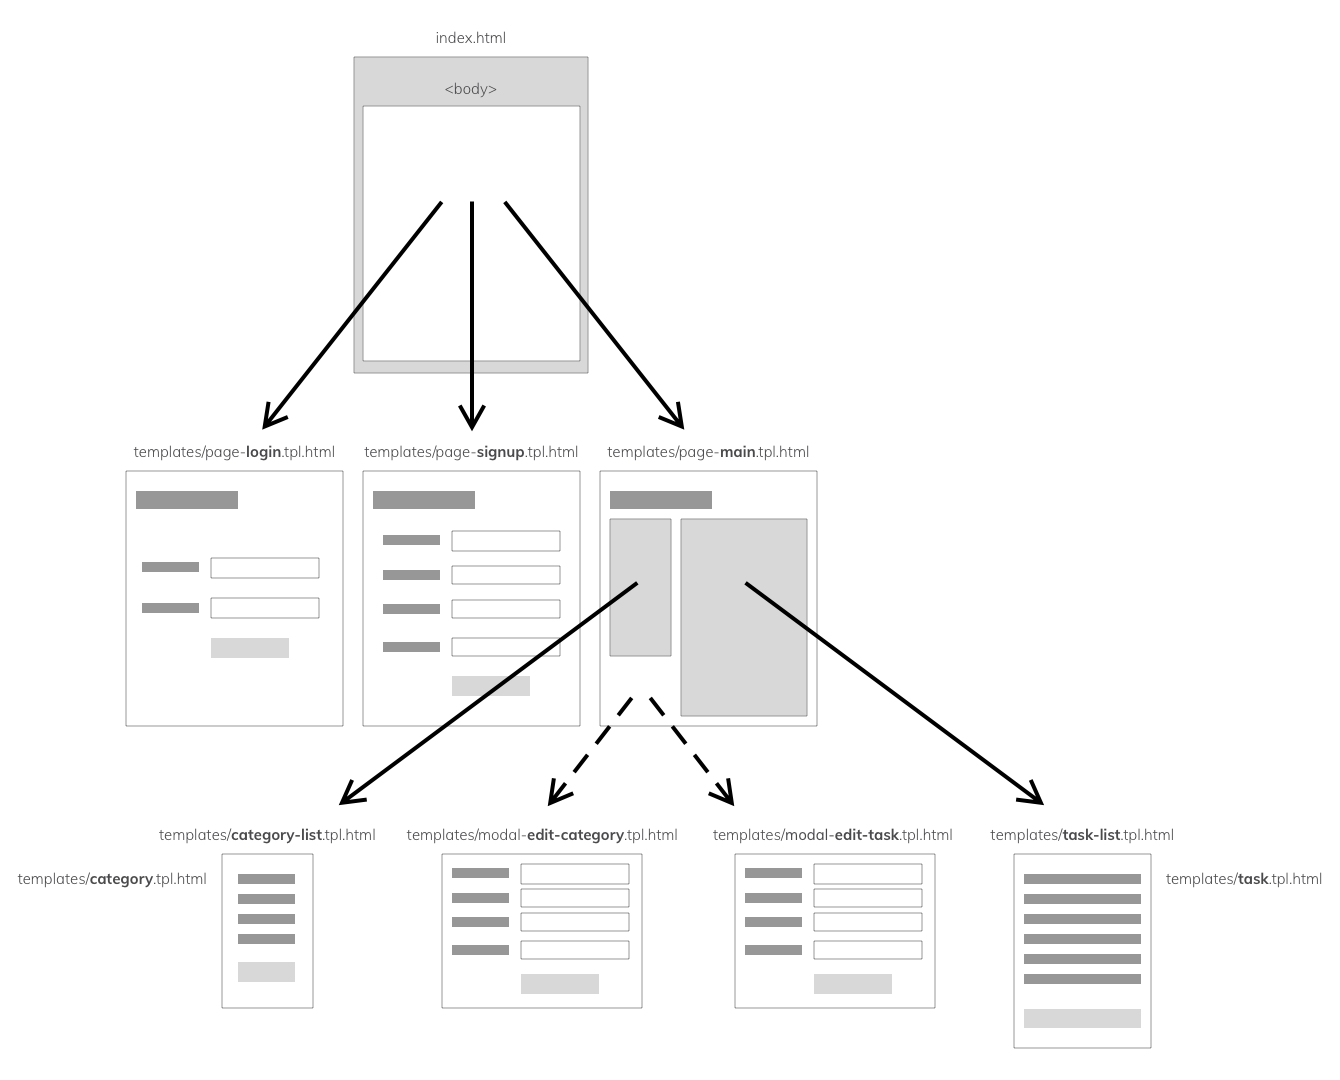
index.htmlwill be the main application page. As you build out the layouts you can start by placing all your markup here and building your styles. But eventually you will need to chunk out into the various templates below. So be sure to consider these as you go.index.htmlshould contain your standard HTML document structure, but the contents of<body>will be swapped out between the login/signup process and the main task page.templates/page-login.tpl.html- this should contain all markup for your login page alone.templates/page-signup.tpl.html- this should contain all markup for your signup page alone.templates/page-main.tpl.html- this should contain the shell for the main application. All other templates will load inside this page as partials.templates/modal-edit-category.tpl.html- this should be a modal window that contains at least a form allowing users to add/update a category. Ensure that fields are named appropriately and that you have a hidden field for the categoryid. See the updated data structure tables above. Form fieldnameattributes should precisely match the corresponding field name.templates/modal-edit-task.tpl.html- similar to the other modal, this should contain a form that allows the user to edit tasks. Ensure that a hidden field is in place for the taskid.templates/category-list.tpl.html- the list of categories including the add category button.templates/category.tpl.html- a single category item to be loaded as a partial intocategory-list.tpl.html.templates/task-list.tpl.html- the list of tasks including the add task button.templates/tasl.tpl.html- a single task item to be loaded as a partial intotask-list.tpl.html.
Here's a diagram of the page and template structure we'll eventually wire together (right-click and choose "Open Image in New Tab" or similar to see at full size):
Deliverable D: Scripting Progress
Use the instructions provided in the Guide in Codio to begin to script your application. Aim to finish through the end of "Coding Part 1" in the guide.
Final Submission
Finish up the remaining work on your application and complete it by the deadline.